How it Works
Grading Procedure
1. Colour Deficiency Test: To ensure colour accuracy, we strongly recommend taking this simple colour vision test, known as the Ishihara Test.
2. Calibrate Device: It is essential that you ensure the screen of your electronic device is properly calibrated before you start using the ColourWise Colour Grading System.
3. Correct Lighting: The temperature of light a gemstone is viewed under can have a major impact on the resulting colour. It is therefore necessary to use a light source that is in the 5000 to 5500 Kelvin range.
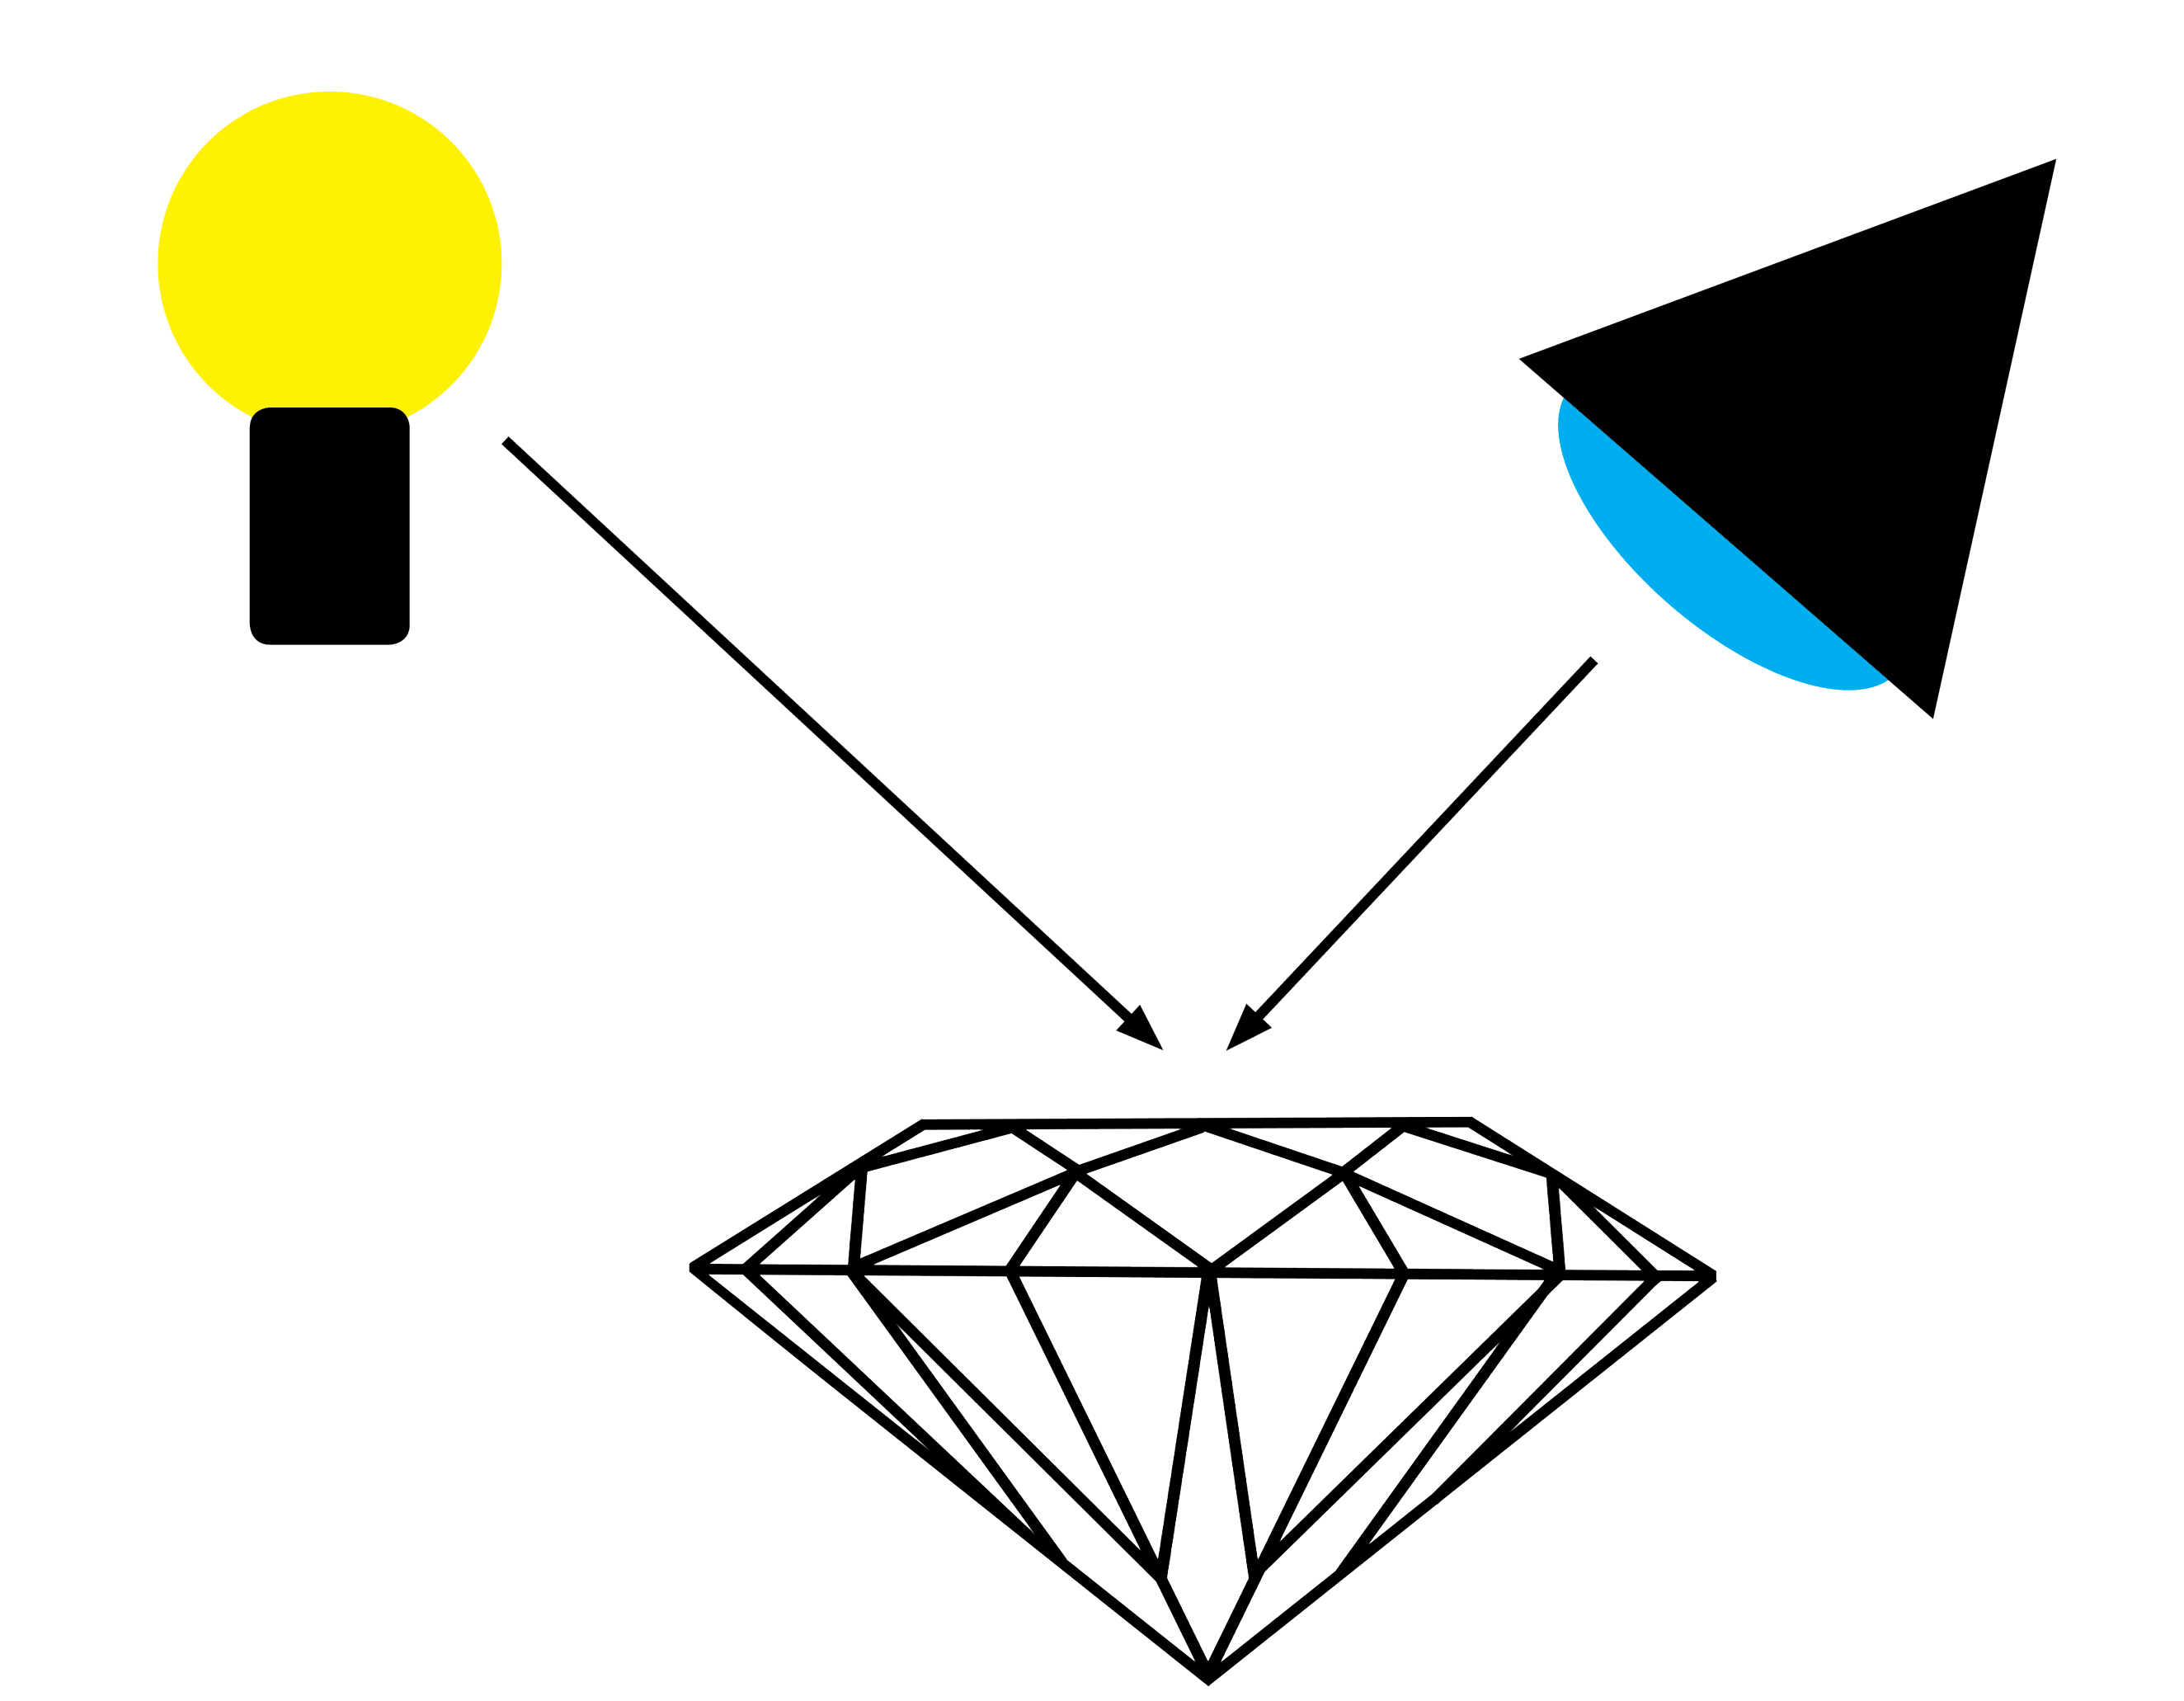
4. Correct Viewing: It is imperative that any gemstone be colour graded through the table facet in a face-up position with an overhead light source and a neutral background.
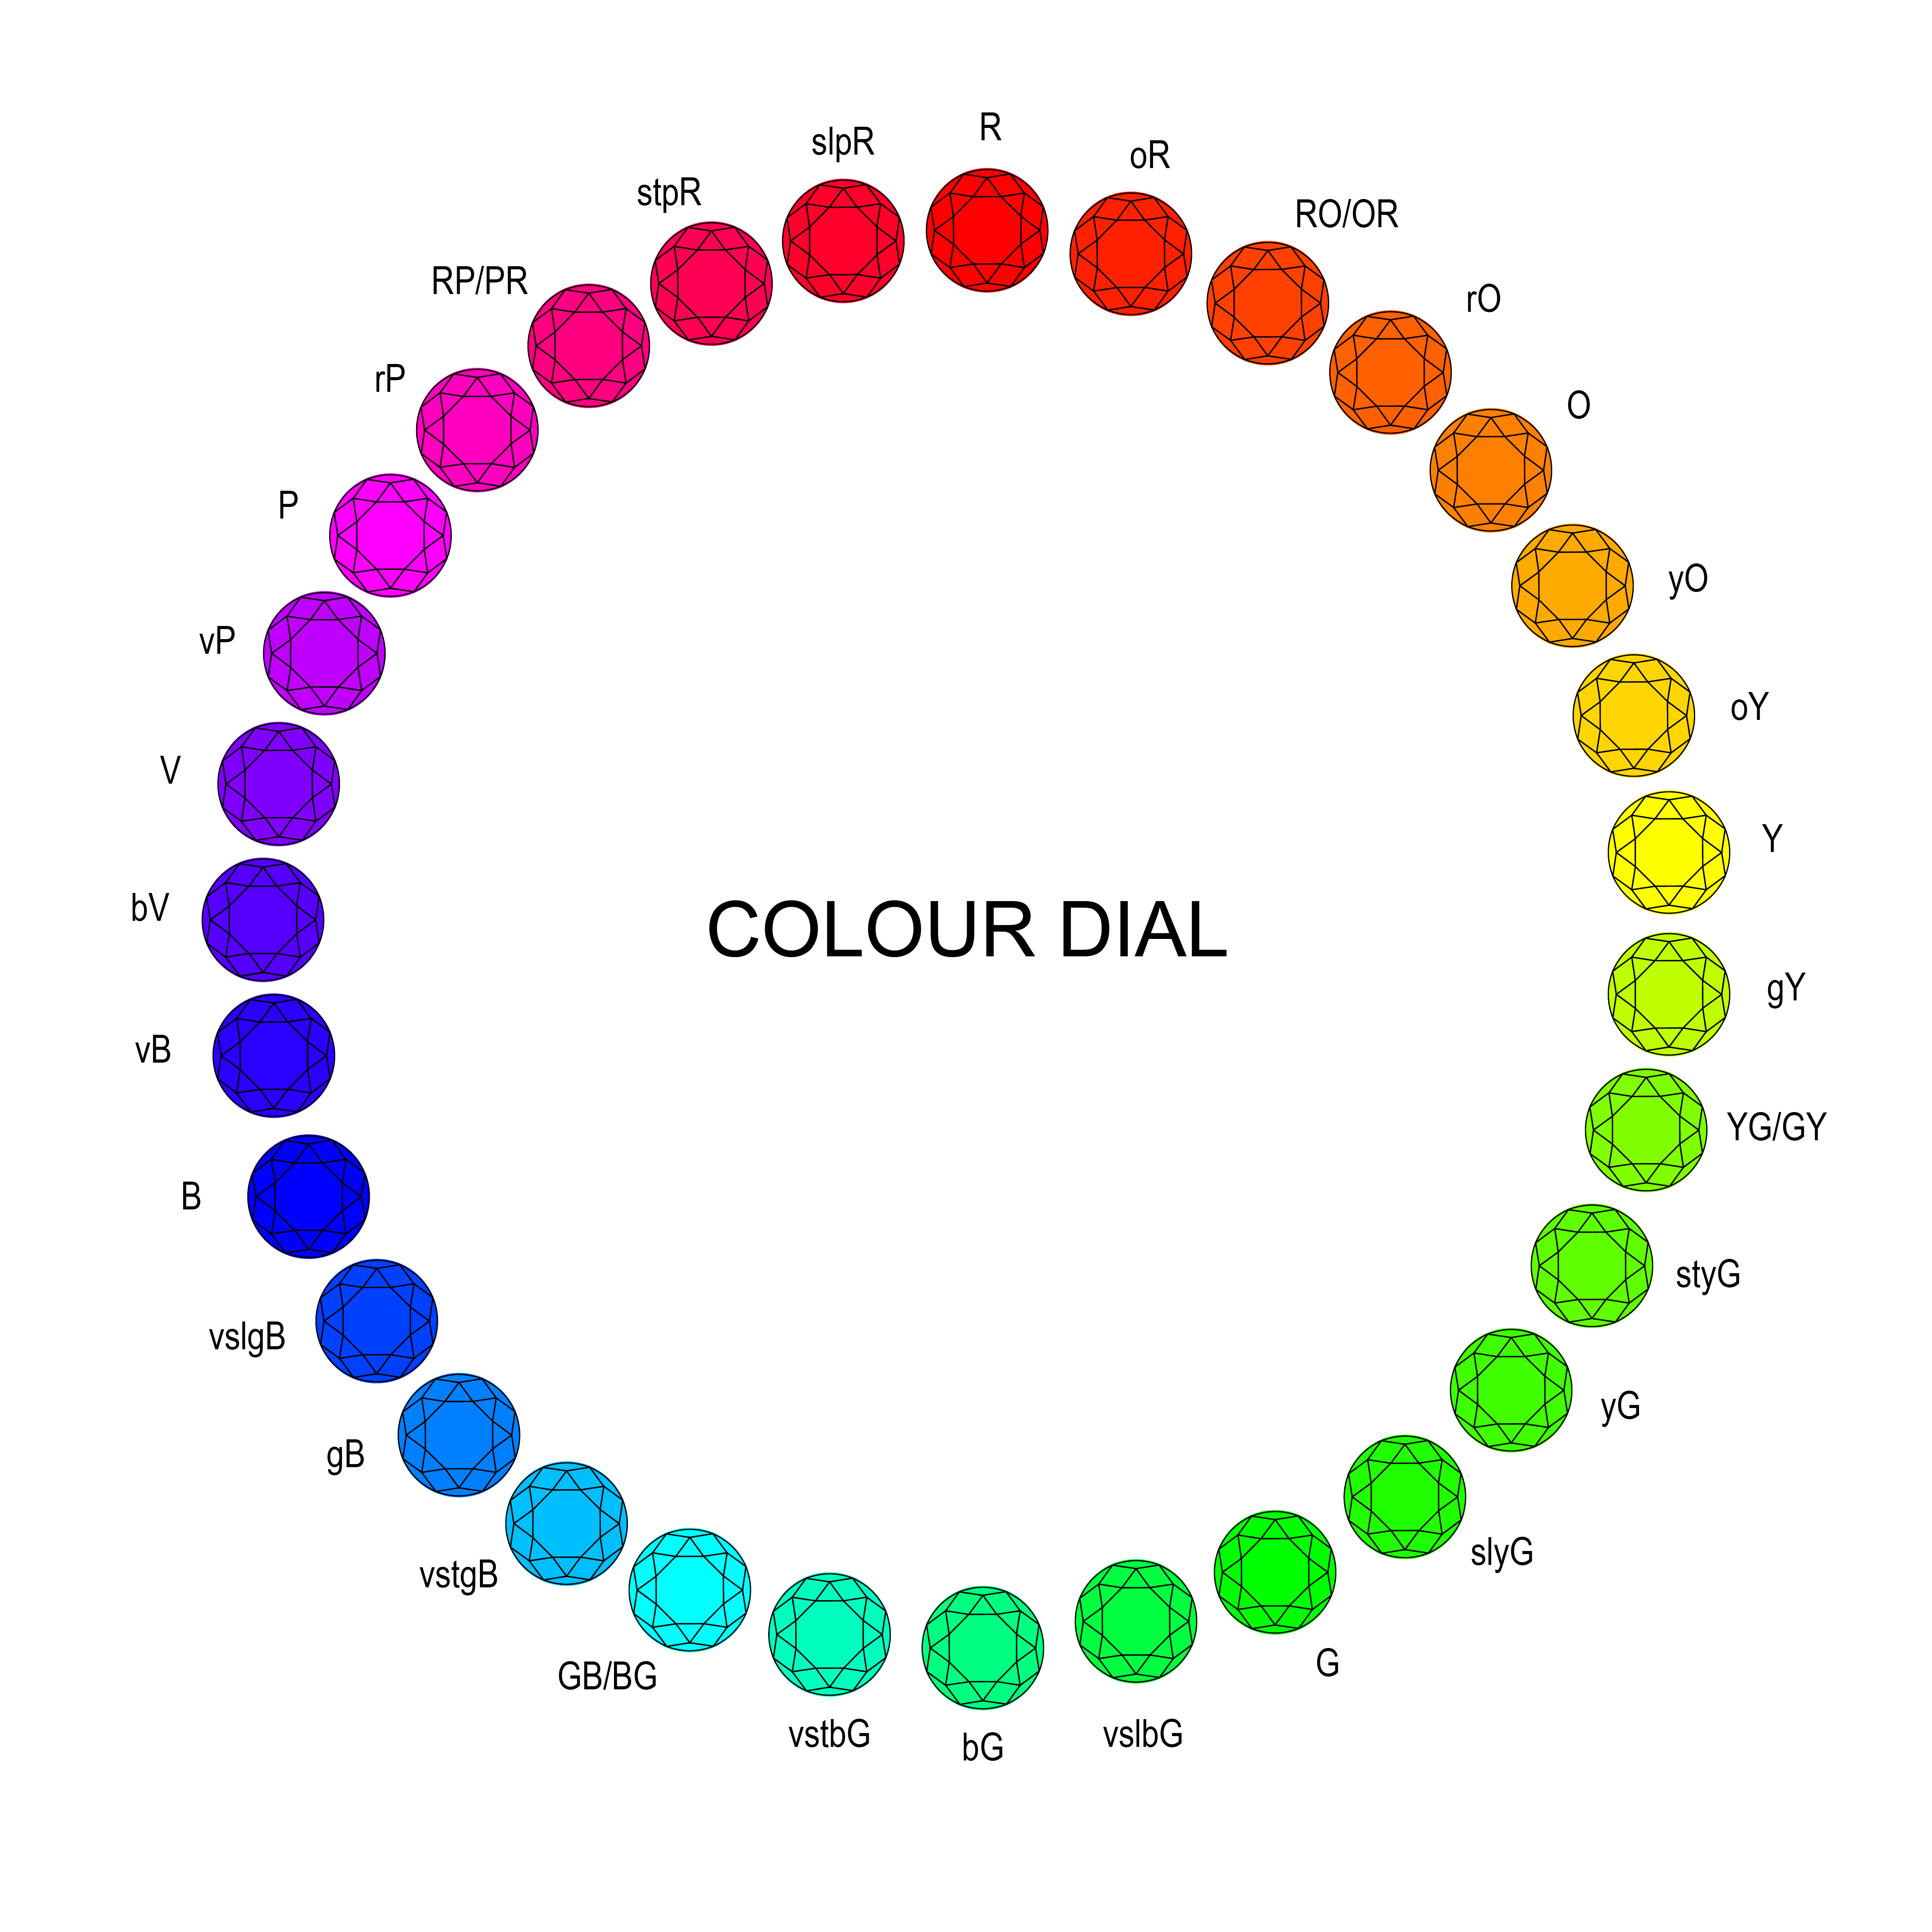
5. Primary and Secondary Hues: The ColourWise Colour Dial consists of thirty-one (31) hues. Seven are primary hues (RED, ORANGE, YELLOW, GREEN, BLUE, VIOLET and PURPLE) while the remaining twenty-four (24) consist of primary and secondary hues (i.e. greenish BLUE). Click on a hue from the ColourWise Colour Dial that is closest to the gemstone being graded.
ColourWise Tip: A dichroscope can be very helpful in identifying any secondary hues.
6. ColourWise Colour Grid: A ColourWise Colour Grid will open consisting of thirty-five (35) colour samples arranged in five (5) saturation levels from left to right in 20% increments (20%, 40%, 60%, 80% and 100%) and seven (7) lightness levels from top to bottom in 10% increments (80%, 70%, 60%, 50%, 40%, 30%, 20%).
EXAMPLE: BLUE
Low
Very Light
Moderately Low
Moderate
Moderately Strong
Strong
Light
Medium Light
Medium
Medium Dark
Dark
Very Dark
7. ColourWise QuickLinks & HotSpots: To help refine your search, you will find the ColourWise QuickLinks and HotSpot icons at the top of each ColourWise Colour Grid.
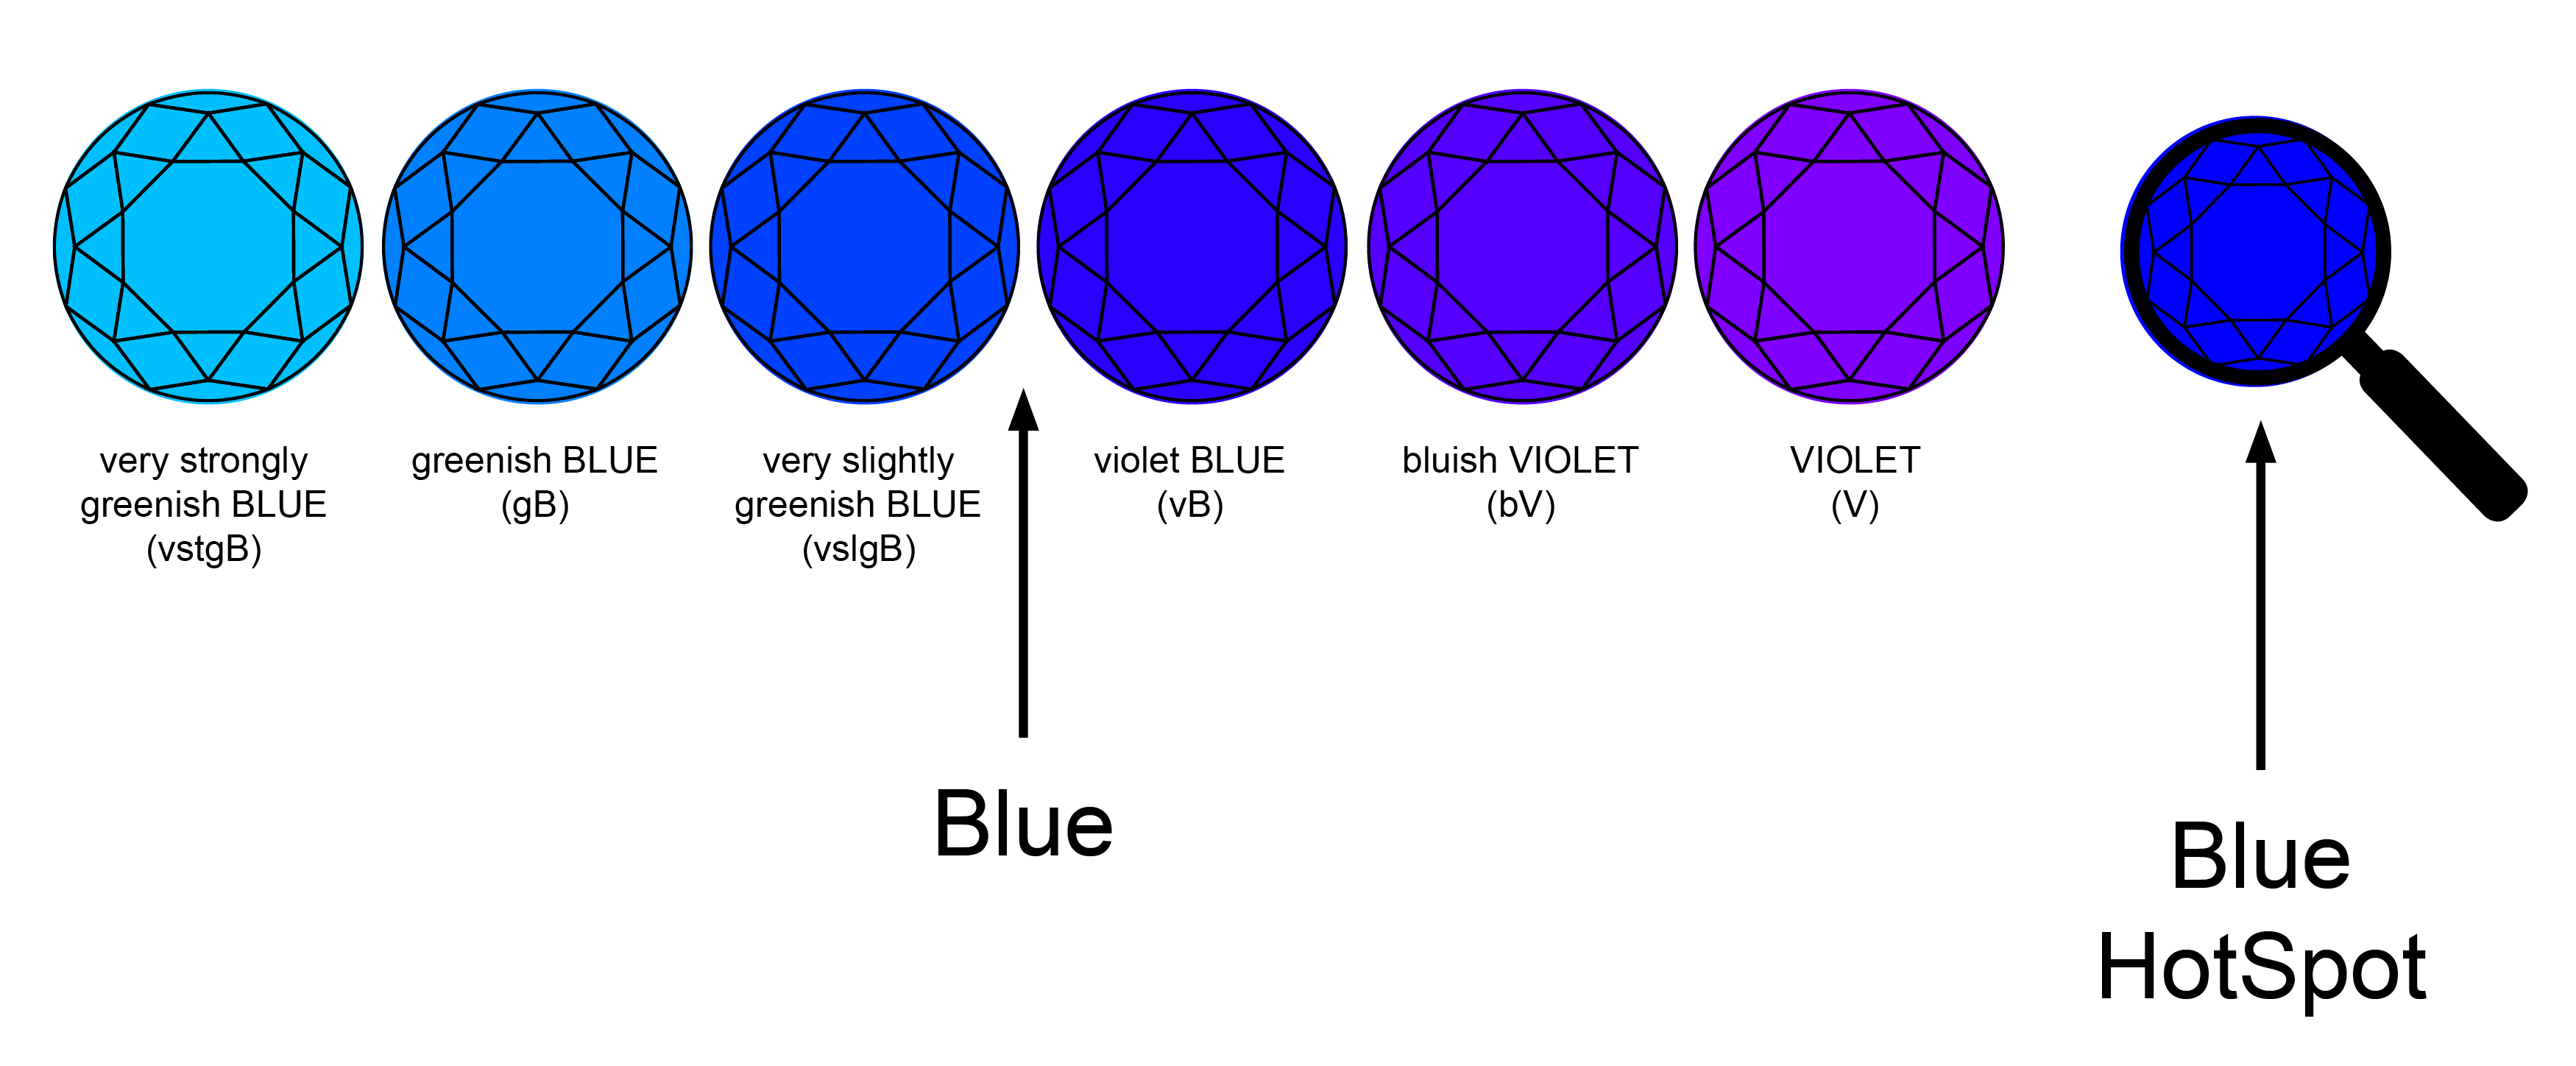
8. ColourWise QuickLinks: The six 'QuickLinks' represent the six hues that correspond to the BLUE hue. The three on the left are found counterclockwise to the 'selected hue' on the ColourWise Colour Dial, while the three on the right are found clockwise to the 'selected hue' on the ColourWise Colour Dial. By clicking on these links, the user can quickly check hues that might be possible options if the 'selected hue' is not correct. The ColourWise Colour Dial is arranged by 'degrees' with RED being 0 degrees, ORANGE (30 degrees), YELLOW (60 degrees), GREEN (120 degrees), BLUE (240 degrees), VIOLET (270 degrees) and PURPLE (300 degrees).
9. ColourWise HotSpot: Clicking on the 'Magnifying Glass' will open a separate window that consists of fifteen (15) colour samples arranged in five (5) saturation levels from left to right in 5% increments (80%, 85%, 90%, 95% and 100%) and three (3) lightness levels from top to bottom in 10% increments (60%, 50% and 40%). These represent the 'Key' hue, saturation and lightness combinations in each ColourWise Colour Grid and will help the user refine their search.
EXAMPLE: BLUE HotSpots
Medium Light
Strong
Strong
Strong
Strong
Strong
Medium
Strong
Strong
Strong
Strong
Strong
Medium Dark
Strong
Strong
Strong
Strong
Strong
10. Assigning a Colour Grade: Once you have selected the hue, saturation and lightness levels that are the closest match to the gemstone being graded, you have two ways to communicate this colour:
Option One: The colour can be described as B/80/50. This indicates that the hue is blue, the saturation level is 80% and the lightness level is 50%.
Option Two: Alternatively, the colour can be described using 'descriptive' terminology. In this example a gemstone graded as B/80/50 would be described as BLUE with moderately strong saturation (80%) and medium lightness (50%). Please note that if you use 'descriptive' terminology, you must also include the percentages for saturation and lightness since both represent 'percentage ranges'.
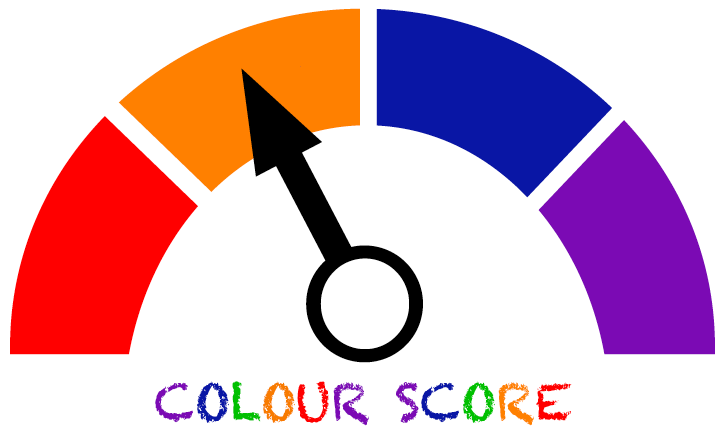
11. Assigning a Colour Score: Once the hue, saturation and lightness of the stone has been established, a 'Colour Score' can be assigned that ranges from 2 to 10. This will form the 'base' score for the gemstone and is based on systems used by GIA and GemGuide.
The 'Colour Score' icon can be found at the bottom of each ColourWise Colour Grid. Clicking on this icon will take you to a separate page that contains the identical colour grid with the assigned scores. The ColourWise Colour Grading System includes 2,000 individual colour scores. Scores marked with an (*) represent additional ColourWise scores that reflect the higher levels of saturation. For example, if a spinel with a BLUE hue has a score of 10 with a saturation of 80 and a lightness level of 50, a blue spinel with a saturation of 100 and a lightness level of 50 will also score a 10.
12. Assigning a Clarity Grade: ColourWise uses a clarity grading system that consists of three components; degree of inclusions, transparency and colour zoning. These are based on the 'clarity type' (Type 1, 2 & 3) and include adjustments that either reduce or increase the 'Colour Score'.
13. Assigning a Cut Grade: ColourWise uses a cut grading system that consists of three components; light performance, proportions and finish and includes adjustments that either reduce or increase the 'Colour Score'.
14. Assigning a Final Score: Once the hue, clarity and cut grades have been established, a final score can be calculated using the downloadable ColourWise Grading worksheet.
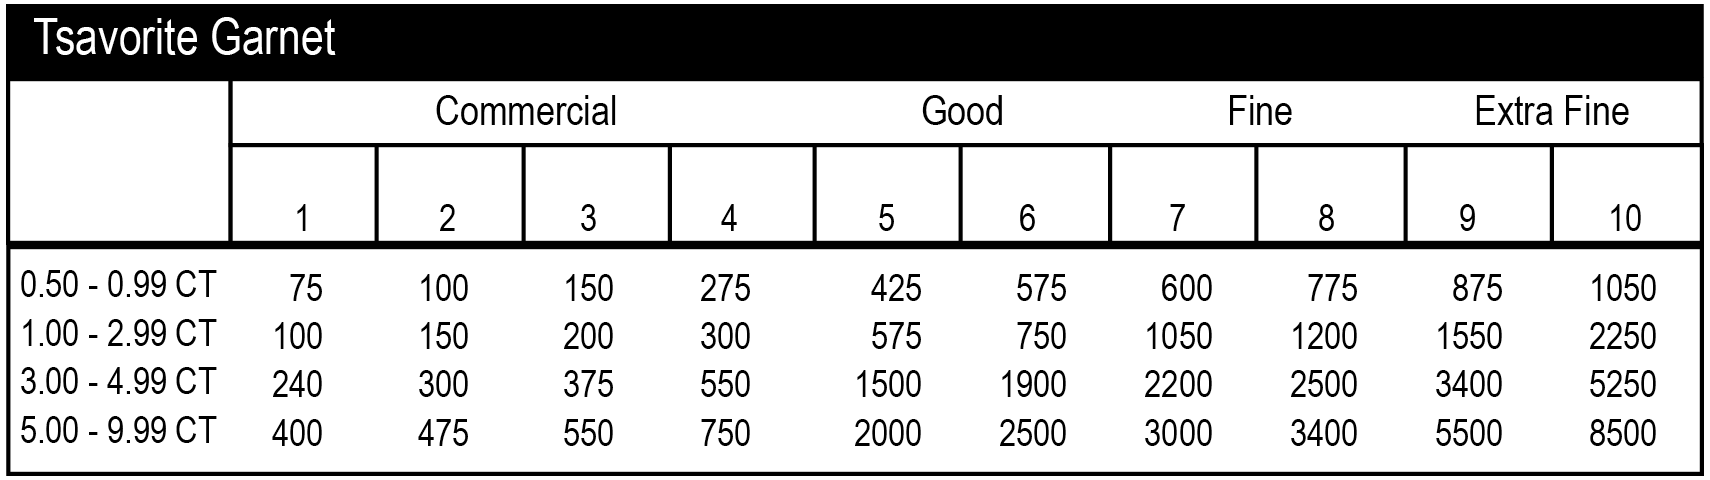
15. Assigning a Value: Once the final score has been calculated, a value can be calculated using GemGuide, a wholesale pricing guide published by Gemworld International. Their pricing grids are organized into four qualities (Commercial 1 to 4), Good (5 to 6), Fine (7 to 8) and Extra Fine (9 to 10) with weight categories that vary based on the particular gemstone. To calculate a value, simply go to the quality sub-category (i.e. 8) that represents the 'Final Score' and find the correct weight category. The values stated are 'per carat' in US Dollars. Multiply the price per carat by the weight of the gemstone (i.e. 1.50 carats x $ 1200 per carat = $ 1800 USD) to arrive at the wholesale value.